Terminal & Simulator Setup
Overview
This section walks through the steps involved in setting up Android terminal applications, such as the Android Sample Billing App and Android PosBridge Application.
The POS Bridge Application can be configured to operate as a Payment Terminal simulator. In this mode, POS Bridge processes payment transactions without connecting to a processor. This setup is useful for integrations that don't require a physical payment terminal.POS Bridge with simulator option enabled can run on any Android mobile device.
Terminal Setup
Sample Billing App
Pre-Requisite
- Minimum Version: Android 6
- Maximum Version: Android 12
Installation
- Download the billing app from here .
- The sample billing app is compatible with Android devices running a minimum Android version of 4.
- Once installed on home screen application shows the device details
- To add a TCP device, follow these steps:
- Click on the "Settings" icon.
- Click on "Scan" under the TCP tray. This will initiate a scan and display a list of available devices.
- Select the desired device from the list.
- Save the settings.
- Ensure that both the Android device running the Billing Application and the Android Payment Terminal (POS device) are connected to the same network for TCP/IP connection.
- To add a Bluetooth (BT) device, follow these steps:
- Click on the "Settings" icon.
- Click on "Scan" under the BT tray. This will scan for available BT devices and list them.
- Select the required BT device from the list.
- Save the settings.
- After adding the devices, click "Save Settings" to confirm the configurations.
- Once the devices are successfully added, the home screen will now display the configured device details.
- To perform transaction
- Enter amount
- Select the required transactions
- Click on “Process”.
POS-Bridge
POS Bridge Application can be configured to work as Payment Terminal simulator. In this mode, POS Bridge processes the Payment transactions without connecting to processor. This mode can be used for Integrations without the need of Physical Payment terminal as POS Bridge in this mode runs on any Android Mobile
Pre-Requisite
- Minimum Version: Android 5
- Maximum Version: Android 13
Installation
- Download POS Bridge app from here
- POS Bridge app should be installed on Android Payment Terminal along with the PineLabs payment app.
- Once POS Bridge application installed, the home screen shall display the following Device information:
- Device serial number
- Device Name
- Device IP
- POS Bridge listing port
- By default, demo mode shall be disabled in POS Bridge app.
- If user decides to use the application in demo mode, the below steps shall be followed
- Click “ Setting” icon
- Enter Password (presently set to 123456)
- Enable (Mark) “Demo Mode”
- Save settings
- By default direct usb connectivity shall be enabled. If user wants to communicate with base
the below steps shall be followed:
- o Click “Setting” icon
- o Enter Password (presently set to 123456)
- Select “USB RS232”
- Enter Base serial number
- Click on “ -> Connect to Base”
- Save settings (only if base is connected successfully)


Simulator Setup
"Simulator Setup" shall have two sections Simulator and Test values. Simulator shall have steps to configure the POS Bridge in demo mode and test values section does not need any changes
Simulator
- By default, demo mode shall be disabled in POS Bridge app.
- If user decides to use the application in demo mode, the below steps shall be followed
- Click “ Setting” icon
- Enter Password (presently set to 123456)
- Enable (Mark) “Demo Mode”
- Save settings
Test Values
POS Bridge in Simulator/Demo mode supports below listed error scenarios which can be tested using the specific transaction amounts listed below
| Amount | Transaction Result |
|---|---|
| 401.00 | Successful EMV Contact transaction |
| 402.00 | Successful EMV Contactless transaction |
| 403.00 | Successful Magstripe transaction |
| 404.00 | Declined Contactless transaction |
| 405.00 | Declined EMV Contact transaction |
| 406.00 | Declined Magstripe transaction |
| 407.00 | Declined Sale transaction |
Off-Device Integration
In this approach, the Merchant Billing application, running on iOS devices such as tablets or mobile phones, communicates with the Pine Labs Payment application by integrating the iOS Poslib. The iOS Poslib facilitates communication with the pinelabs Payment application via POSBridge.
The Merchant Billing application needs to integrate Poslib to communicate with the POS Bridge application through POS Lib APIs. The message exchange between POS Lib and POS Bridge can occur over IP.

The Billing System communicates with POSBridge application via POSLib APIs. Message exchange between POSLib and POSBridge can happen over IP. The Billing System running on the PineLabs Payment Terminal has the capability to perform transactions via app-to-app communication.
The following sequence diagram describes the transaction flow:
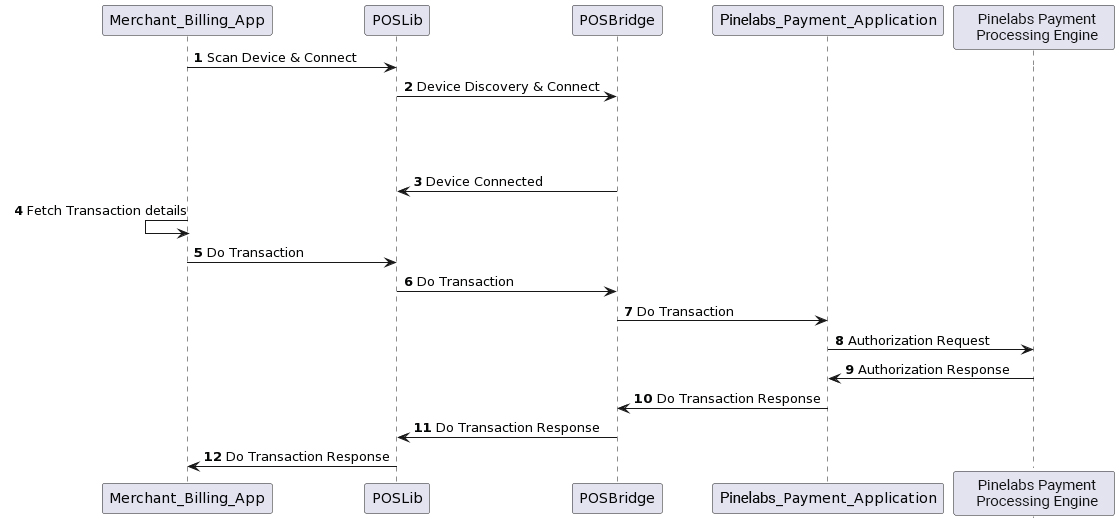
Merchant Billing Application shall be integrated with POSLib to perform transactions with Payment application
- Merchant Billing Application calls scan & connect IP via PosLib APIs
- PosLib will send device discovery request to connect with PosBridge
- PosBridge will respond with the device connected status.
- Merchant Billing Application will fetch transaction details
- Merchant Billing Application sends the transaction request to PosLib by calling doTransaction API.
- PosLib will process the doTransaction and forward the transaction request to PosBridge.
- PosBridge will process the doTransaction request and forward the transaction request to PineLabs Payment Application.
- PineLabs Payment Application will process the transaction request and sends the payment request to payment controller for authorization
- Payment controller sends the payment authorization response to PineLabs payment Application.
- PineLabs Payment Application will process the payment authorization response and sends the doTransaction response to PosBridge.
- PosBridge will process the doTransaction response and forward the doTransaction response to PosLib.
- PosLib will process the doTransaction response and forward the doTransaction response to Merchant Billing Application
Supported Features
The following features (APIs) are supported by iOS POSLib:
| Supported APIs | Functionality / Description |
|---|---|
| PosLibServicesImpl | Create an instance of PosLibServicesImpl and initialize it with the POS lib. This will be the first step towards calling the API. |
| scanOnlinePOSDevice | This API will be used to discover/scan for POS devices in same network (Wi-Fi) |
| setConfiguration | This API will be used set the required configuration to POSLib |
| getConfiguration | This API will be used get the configuration settings from POSLib |
| comTest | This API will be used to check for TCPIP connection with POSBridge |
| doTransaction | This API will be used to perform transaction with Payment Application |
POSLib framework Integration
This section describes the pre-requisites and steps to integrate POSLib framework with the Merchant Billing Application.
Pre-requisites
- Ensure you have latest version POSLib
- Ensure you have latest version of XCode (14.x) installed in your system.
Steps to integrate POSLib
Step 1: Add generated PosLib.xcframework into the Billing Application for debug and release inside Archives -> Binaries -> extracted file -> PosLib.xcframework
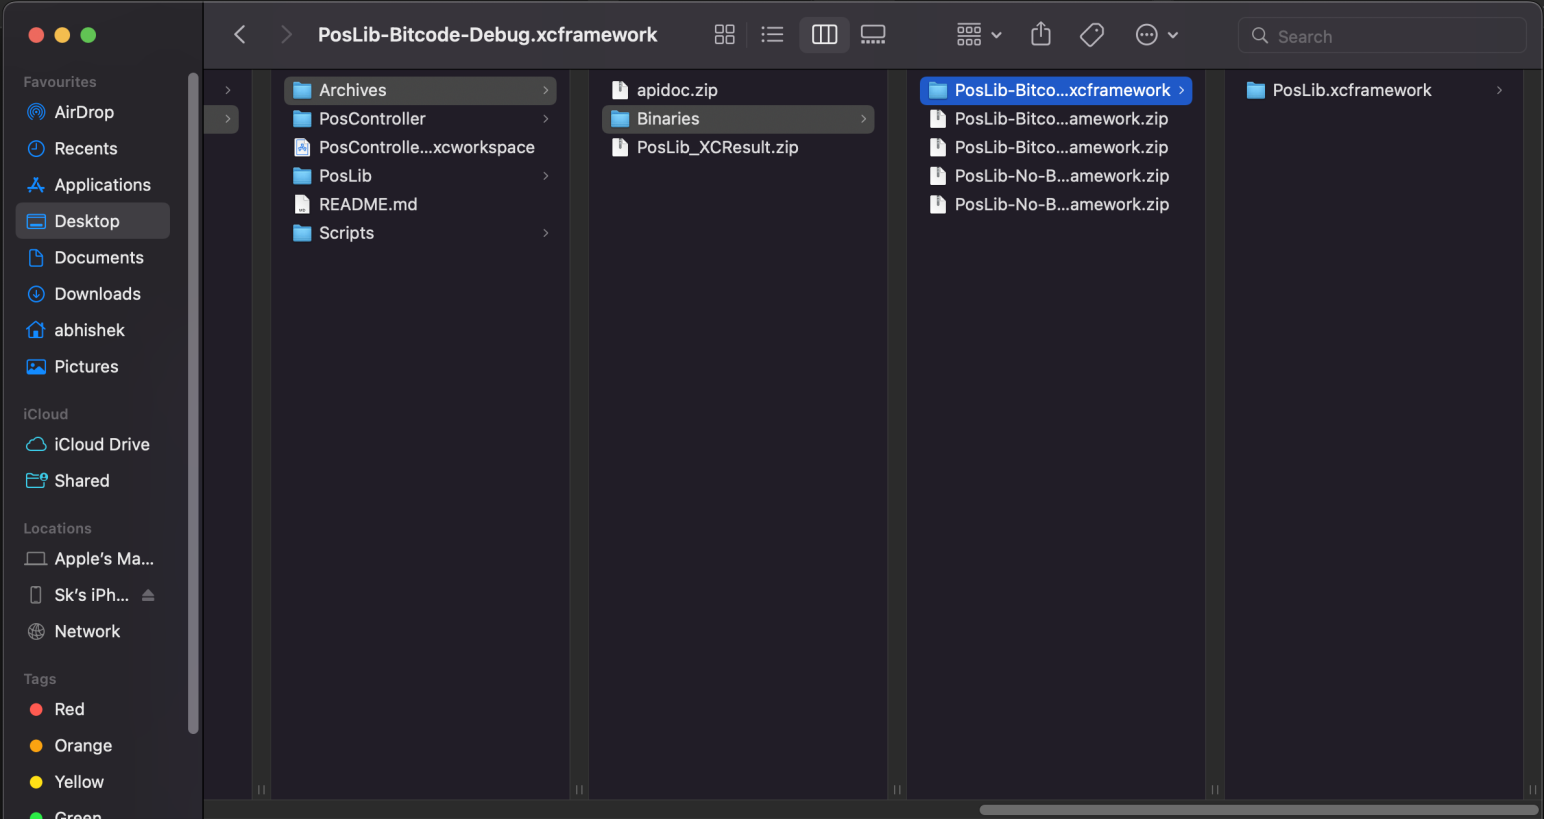
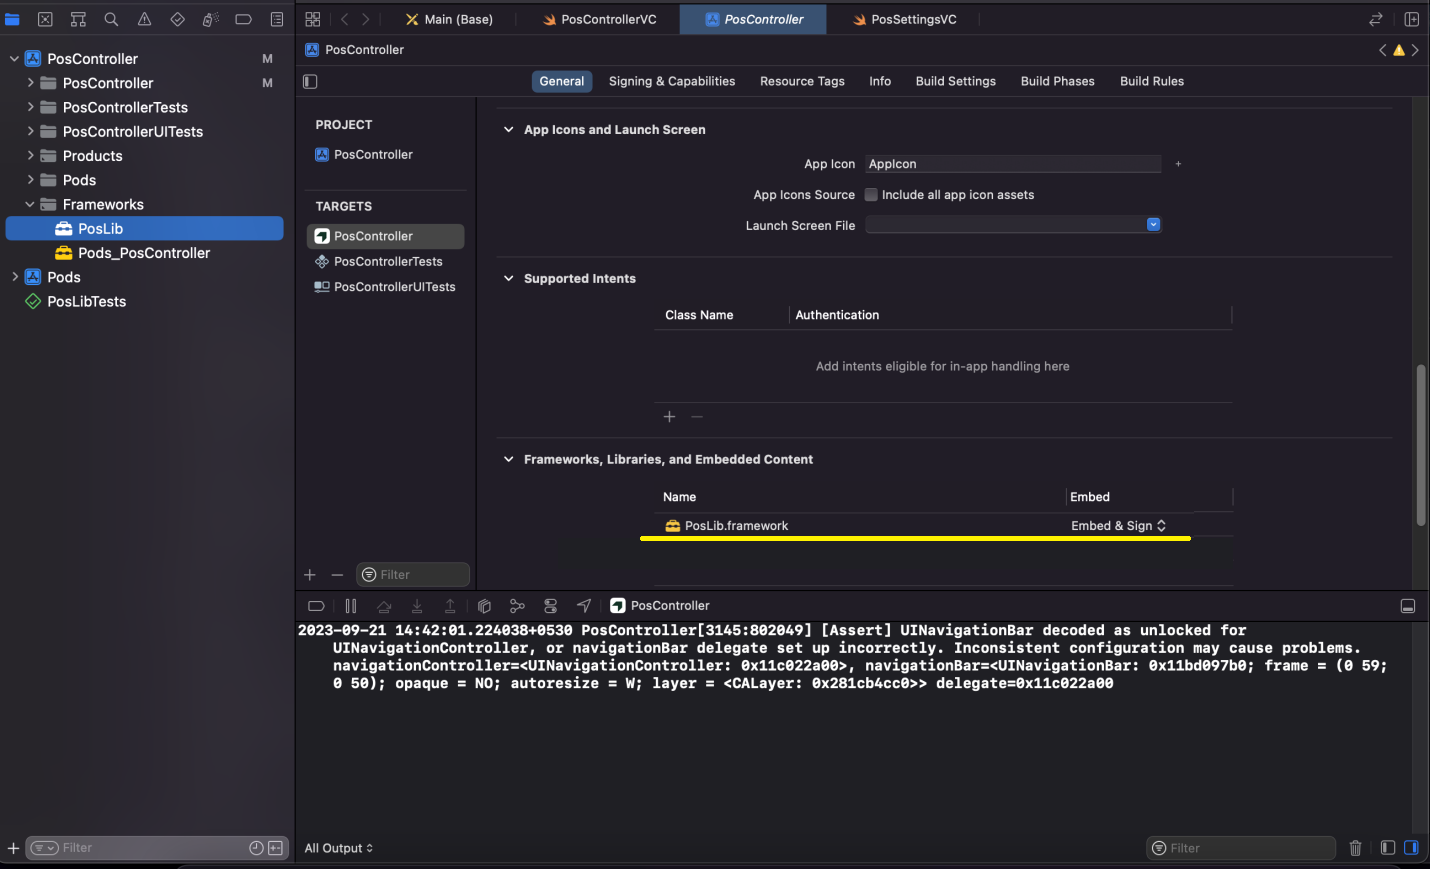
Step 2: Import iOS PosLib Framework into frameworks folder which is generated in Archives -> Binaries -> PosLib-Bitcode-Debug -> PosLib.xcframework.
Add PosLib.xcframework from framework folder as an embedded content in Billing application project settings (as shown below).
Step 3: Add Local Network Usage Description, Bonjour Services, Bluetooth Always Usage Description and Supported external accessory protocols to info.plist of the Billing Application.

API Integration
Below section describes the APIs exposed by PosLib, details of the API and integration sample code snippets.
Note: The sample code snippets provided in this document are currently supported only in Swift. These code snippets might have to be customized if you want to test them on Objective-C.
PosLibServicesImpl
This API shall be used to Initialize the POS lib. This shall be the first API to be called.
| Signature | var posLibServices: PosLibServicesImpl() |
| Description | Once we integrate the PosLib framework. This is the first step we perform to initialize the PosLibSercies which is done in Splash View Controller |
| Parameters | None |
| Returns | Creates the object of PosLibServicesImpl class |
| Call-backs | None |
| Error Condition | None |
Code snippet for posLibInitialize:
Initialize POSLib using the following code:
Swift
override func viewDidLoad() {
super.viewDidLoad()
// Create an instance of PosLibServicesImpl
posLibServices = PosLibServicesImpl()
// Set the text of the "lblVersion" label to display the application version
self.lblVersion.text = "Version: \(posLibServices!.getPosLibVersion())"
}
scanOnlinePOSDevice
This API will discover/Scan the PinLabs payment terminals on the same network where POSBridge is running on it and list them
| Signature | func scanOnlinePOSDevice(ransactionListener: self) |
|---|---|
| Description | This API will be used to auto discover/scan for POS device in same network (Wi-Fi) |
| Parameters |
|
| Returns | message received |
| Call-backs | state update Handler - state |
| Error Condition |
|
Code snippet for scanOnlinePOSDevice:
Swift
@IBAction func scanTCPIPDevices(_ sender: UIButton) {
if (networkIP != nil) {
// Initiate the scanning process for online POS devices
posLibServices!.scanOnlinePOSDevice(transactionListener: self)
}
else {
//Invalid Conditions
}
}
ConfigData Details
This class will have the details of the device which will be used during discovery/scan over IP.
Code snippet for ConfigData Details
Swift
@objc public class ConfigData: NSObject {
var cashierID: String = ""
var cashierName: String = ""
var connectionFallback: Bool = false
var connectionPriority: String = ""
var connectionTimeout: Int = 0
var connectionRetries: Int = 0
var tcpIP: String = ""
var tcpPort: Int
var btDeviceName: String = ""
var btDeviceSSID: String = ""
var networkIpTest: Bool = false;
}
setConfiguration
This API will set POS Library configurations related to connectivity, priority settings, and logging options.
| Signature | setConfiguration(configData: ConfigData) |
|---|---|
| Description | Set the required configuration to PosLib |
| Parameters | configData - Configuration Data |
| Returns | 0 - Success < 0 - Failure |
| Call-backs | None |
| Error Condition |
|
Code snippet for setConfiguration:
Swift
func saveConfigurations() {
let configData = ConfigData(cashierID: self.settingsItem.cashierID,
cashierName: self.settingsItem.cashierName,
connectionFallback: self.settingsItem.poslibLogsRequired,
connectionPriority: self.settingsItem.connectionPriority,
connectionTimeout: self.settingsItem.connectionTimeout,
connectionRetries: self.settingsItem.connectionRetries,
tcpIP: self.settingsItem.tcpIP,
tcpPort: "\(self.settingsItem.tcpPort)",
btDeviceName: self.settingsItem.btDeviceName,
btDeviceSSID: self.settingsItem.btDeviceSSID)
posLibServices!.setConfiguration(configData: configData)
}
getConfiguration
This API should be used to retrieve POS Library configurations related to connectivity, priority settings, and logging options.
| Signature | getConfiguration() -> ConfigData |
|---|---|
| Description | Gets the configuration settings from PosLib |
| Parameters | None |
| Returns | 0 - Success < 0 - Failure |
| Call-backs | None |
| Error Condition |
|
Code snippet for getConfiguration:
Swift
@IBAction func testTCPIPConnection(_ sender: UIButton) {
if (UserDefaults.standard.bool(forKey: "networkStatus") {
let configData = posLibServices!.getConfiguration()
}
else {
//showing alert to enable network to getConfig details and other conditions as well
}
}
comTest
This API will verify connectivity between the merchant billing system and the iOS payment terminal in IP connectivity mode.
| Signature | comTest(tcpIp ip: String, tcpPort port: String, transactionListener txnListener: TransactionListener) |
|---|---|
| Description | This API will be used to check for TCPIP connection |
| Parameters |
|
| Returns | 0 - Success < 0 - Failure |
| Call-backs | None |
Code snippet for comTest:
Swift
@IBAction func testTCPIPConnection(_ sender: UIButton) {
if (networkIP != nil || (UserDefaults.standard.bool(forKey: "networkStatus”))) {
posLibServices?.comTest(tcpIp: configData.getTcpIP(), tcpPort: "\(configData.getTcpPort())", transactionListener: self)
}
else {
// Checking Other conditions
}
}
doTransaction
This API will be used to perform transaction with iOS Payment Application
| Signature | func doTransaction(paymentRequest message: String, transactionType txnType: Int, transactionListener txnListener: TransactionListener) |
| Description | This API shall be used for transaction processing with Payment Application |
| Parameters |
paymentRequest - Request message body from billing application. transactionType = 6 // payment transaction type |
| Returns | None |
| Call-backs |
OnSuccess(String paymentResponse) - paymentResponse data for all the supported transaction types OnFailure(String errorMsg, int errorCode) - Error Message - Error Code |
| Error Condition |
• Response timeout • Parsing error • Network down • Comm disconnected |
Code snippet for doTransaction:
Swift
@IBAction func processTransactionAction(_ sender: UIButton) {
var msgType: Int // take required message type for txn to proceed
let txnTypeValue = Constant.transactionValuesList[self.selectedTransaction]
let csvString = PosHelper.shared.getCSVStringForTxn((txnTypeValue)!, Constant.TXN_NUM, self.amountTextField.text!)
let requestBody = PosHelper.shared.getPaymentPacket(csvString)
if (requestBody != "") {
posLibServices!.doTransaction(paymentRequest: requestBody, transactionType: msgType, transactionListener: self)
}
else {
/*ERROR CONDITIONS*/
}
}
Note : Please refer Transaction type in API's section for more information click here