App to App Integration
Overview
This document serves as a complete reference guide for individuals seeking to utilize the Pine Labs Android Poslib SDK bundled with the billing application available on the terminal. Its primary focus is to assist in the acceptance of payments, the processing of transactions, and the seamless return of payment results to the invoking Android application.
The billing system can be integrated Android platform in the following ways:
- On-Device Integration (App to App-Integration)
The merchant billing application should internally use the POS Lib to communicate with the Pine Labs payment application.
following sections provide detailed insights into On-Device (App to App) Integration processes.
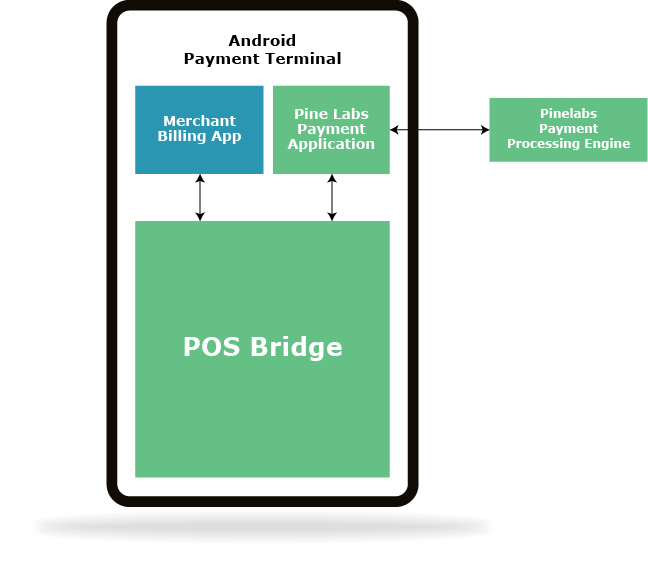
On-Device Integration (App to App Integration)
The third-party merchant billing applications that co-exist on the payment terminal can perform transactions with the payment application using POS Lib APIs.
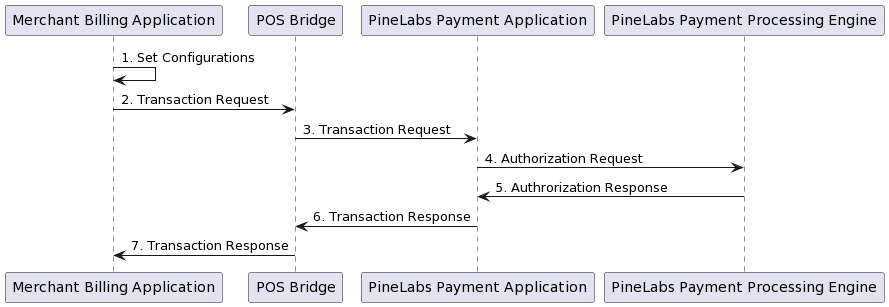
The following sequence diagram describes the transaction flow for On-Device Integration.
The merchant billing application shall be communicated with the POS Bridge via App2App mode to perform transactions with the Pine Lab Payment application.
- The merchant billing application calls the setConfiguration API with "commP1" value as 3.
Refer to the setConfiguration section for details. - The merchant billing application initiates a transaction request.
- POS Bridge processes the transaction request and forwards the transaction request to the Pine Labs Payment application.
- The Pine Labs Payment application processes the transaction request and sends the payment request to the Pine Labs Payment Processing Engine.
- The Pine Labs Payment Processing Engine processes and sends an authorization response to the Pine Labs Payment application.
- The Pine Labs Payment application processes the authorization response and sends the transaction response to POS Bridge.
- POS Bridge processes the transaction response and forwards the transaction response to the merchant billing app.
For setup and installation instructions for Android components, please refer to the Terminal Setup section.
Supported Features
The following features (APIs) are supported by Android POS Lib:
The following features (APIs) are supported by the Android POS Lib:
| Supported APIs | Functionality / Description |
|---|---|
| posLibInitialize | This API will Initialize the POS lib. This should be the first API to be called. |
| setConfiguration | This API will be used to set the required configuration the POS lib |
| getConfiguration | This API will be used to get the configuration settings from the POS lib |
| doTransaction | This API will be used to perform transactions with the Payment application. |
POS Library Integration
This section describes the pre-requisites and steps to integrate the POS library with the merchant billing system.
Pre-requisites
- Ensure you have the latest version of POS Lib
- Ensure you have the latest version of Android Studio installed on your system.
Steps to Integrate POS Lib with the Billing System
- Step 1: Download the POS Lib from here and extract.
-
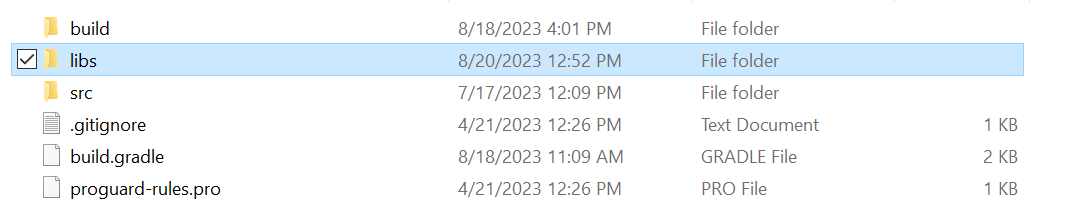
Step 2: Copy the extracted .aar file into the libs folder in your project.
- Step 3: Launch Android Studio.
- Step 4: In build.gradle file under dependency include .aar file like below
-

API Integration
The following section describes the the APIs exposed by POS Lib, and provides sample code snippets.
Note: The sample code snippets provided in this document are currently supported only in Java. These code snippets might have to be customized if you want to test them in Kotlin.
posLibInitialize
This API will be used to Initialize the POS lib. This will be the first API to be called.
| Signature | boolean posLibInitialize(Context context) |
| Parameters | context – Application context |
| Returns | Success or Failure |
| Call-backs | None |
| Error Condition | null context |
Code snippet for posLibInitialize:
Initialize POS Lib using the following code:
Java
PosLibManager.getInstance().posLibInitialize(getApplicationContext());
setConfiguration
This API will set POS Library configurations related to connectivity, priority settings, and logging options.
| Signature | public int setConfiguration(ConfigData configData,Context context); |
| Parameters | configData - Configuration Data context – Application context |
| Returns | 0 - Success -1 - Failure |
| Call-backs | None |
| Error Condition |
Invalid IP Invalid port IP or Port not configured POS Lib not initialized |
Code snippet for setConfiguration:
Java
public class ConfigData { private String tcpIP; private String tcpPort; private String commPortNumber; private String baudRate; private boolean isConnectivityFallBackAllowed; private String btSSID; private String btName; private int commP1;//3=App2App private int commP2; private int commP3; private String connectionMode; private String logPath; private boolean isLogsEnabled; private int logLevel; private int dayToRetainLogs; private int retryCount; private int connectionTimeOut; private boolean isDemoMode; private String cashierID; private String cashierName; private String deviceSlNo; private String deviceId; } private void saveValues() { Log.d(TAG,"Entering saveValues()"); Log.i(TAG,"Saving values to ConfigData..."); ConfigData configData = new ConfigData(); PosLibManager.getInstance().getConfiguration(configData); if (logPathEt.getText().length() > 0) { configData.setLogPath(logPathEt.getText().toString()); Log.i(TAG,"Log Path set: " + logPathEt.getText().toString()); } String logRetainValue = logRetainEt.getText().toString(); if (notNullNotEmpty(logRetainValue)) { configData.setDayToRetainLogs(Integer.parseInt((logRetainValue))); Log.i(TAG,"Day to Retain Logs set: " + logRetainValue); } String logLevelValue = logLevelEt.getText().toString(); if (notNullNotEmpty(logLevelValue)) { configData.setLogLevel(Integer.parseInt(logLevelValue)); Log.i(TAG,"Log Level set: " + logLevelValue); } configData.setCommP1(Constants.APPTOAPP); configData.setLogsEnabled(logOptionCheckBox.isChecked()); Log.i(TAG,"Logs Enabled: " + logOptionCheckBox.isChecked()); PosLibManager.getInstance().setConfiguration(configData,this); Log.i(TAG,"Values saved successfully."); Log.d(TAG,"Exiting saveValues()"); }
getConfiguration
This API should be used to retrieve POS Library configurations related to connectivity, priority settings, and logging options.
| Signature | int getConfiguration(ConfigData configData) |
| Parameters | [out] configData - Configuration Data |
| Returns | 0 - Success -1 - Failure |
| Call-backs | None |
| Error Condition | POS Lib not initialized |
Code snippet for getConfiguration:
Java
public class ConfigData { private String tcpIP; private String tcpPort; private String commPortNumber; private String baudRate; private boolean isConnectivityFallBackAllowed; private String btSSID; private String btName; private int commP1;//1=TCPIP , 2=BT ,3=App2App private int commP2;//1=TCPIP , 2=BT ,3=App2App private int commP3;//1=TCPIP , 2=BT ,3=App2App private String connectionMode; private String logPath; private boolean isLogsEnabled; private int logLevel; private int dayToRetainLogs; private int retryCount; private int connectionTimeOut; private boolean isDemoMode; private String cashierID; private String cashierName; private String deviceSlNo; private String deviceId; } private void setSettingValues() { ConfigData configData = new ConfigData(); PosLibManager.getInstance().getConfiguration(configData); scanDevicetcpIp.setText(configData.getTcpIP()); scanDevicePort.setText(configData.getTcpPort()); scanbtname.setText(configData.getBtName()); scanbtssid.setText(configData.getBtSSID()); connectionTimeOut.setText(String.valueOf(configData.getConnectionTimeOut())); logOptionCheckBox.setChecked(configData.isLogsEnabled()); if (logOptionCheckBox.isChecked()) { logPathEt.setText(configData.getLogPath()); logRetainEt.setText(String.valueOf(configData.getDayToRetainLogs())); logLevelEt.setText(String.valueOf(configData.getLogLevel())); } connectionRetry.setText(String.valueOf(configData.getRetryCount())); ((CheckBox) findViewById(R.id.connection_FallBack_CheckBox)).setChecked(configData.isConnectivityFallBackAllowed()); if (configData.getCommP1() == Constants.TCP_IP) { prioritySpinnerTv.setSelection(0); } else if (configData.getCommP1() == Constants.BT) { prioritySpinnerTv.setSelection(1); } else { prioritySpinnerTv.setSelection(2); } enableDisableLogOptionComView(configData.isLogsEnabled()); }
doTransaction
This API will be used to perform transactions with the Android Payment application.
| Signature | public void doTransaction(Context context, String paymentRequest, int transactionType, TransactionListener transactionListener); |
| Parameters |
context – Application context paymentRequest - Request message body from billing application. Refer APIs for details of the request payload for each transactions transactionType = 6 // payment transaction type transactionListener - transaction listiner |
| Returns | None |
| Call-backs |
OnSuccess(String paymentResponse) - paymentResponse data for all the supported transaction types OnFailure(String errorMsg, int errorCode) - Error Message - Error Code |
| Error Condition |
• Response timeout • Parsing error • BT disconnected • Network down • Comm disconnected |
Code snippet for doTransaction:
Java
String paymentRequest = null ; // Requered only for TxnType 6 (payment transaction) paymentRequest = "10000997001D343030312C545831323334353637382C3130313030302C2C2C2C2C2C2CFF"; // sale transaction re-quest paymentRequest = "10000997001D353130312C545831323334353637382C3130313030302C2C2C2C2C2C2CFF"; // Bank EMI transaction request paymentRequest = "10000997001D353030322C545831323334353637382C3130313030302C2C2C2C2C2C2CFF"; // Brand EMI transaction request paymentRequest = "10000997001D353132302C545831323334353637382C3130313030302C2C2C2C2C2C2CFF"; // UPI transaction request int txnType = 6; // Payment transaction new Handler(Looper.getMainLooper()).postDelayed(() -> { ExecutorService executor = Executors.newSingleThreadExecutor(); executor.execute(() -> PosLibManager. getInstance().doTransaction(MainActivity.this, paymentRequest, TxnType, new TransactionListener() { @Override public void onSuccess(String paymentResponse) { // Success //Convert the payment response from CSV hex string format to byte array format and parse the CSV response. } @Override public void onFailure(String errorMsg, int errorCode) { // Failure //Handle error message and error coded received here } })); executor.shutdown(); }, 100);
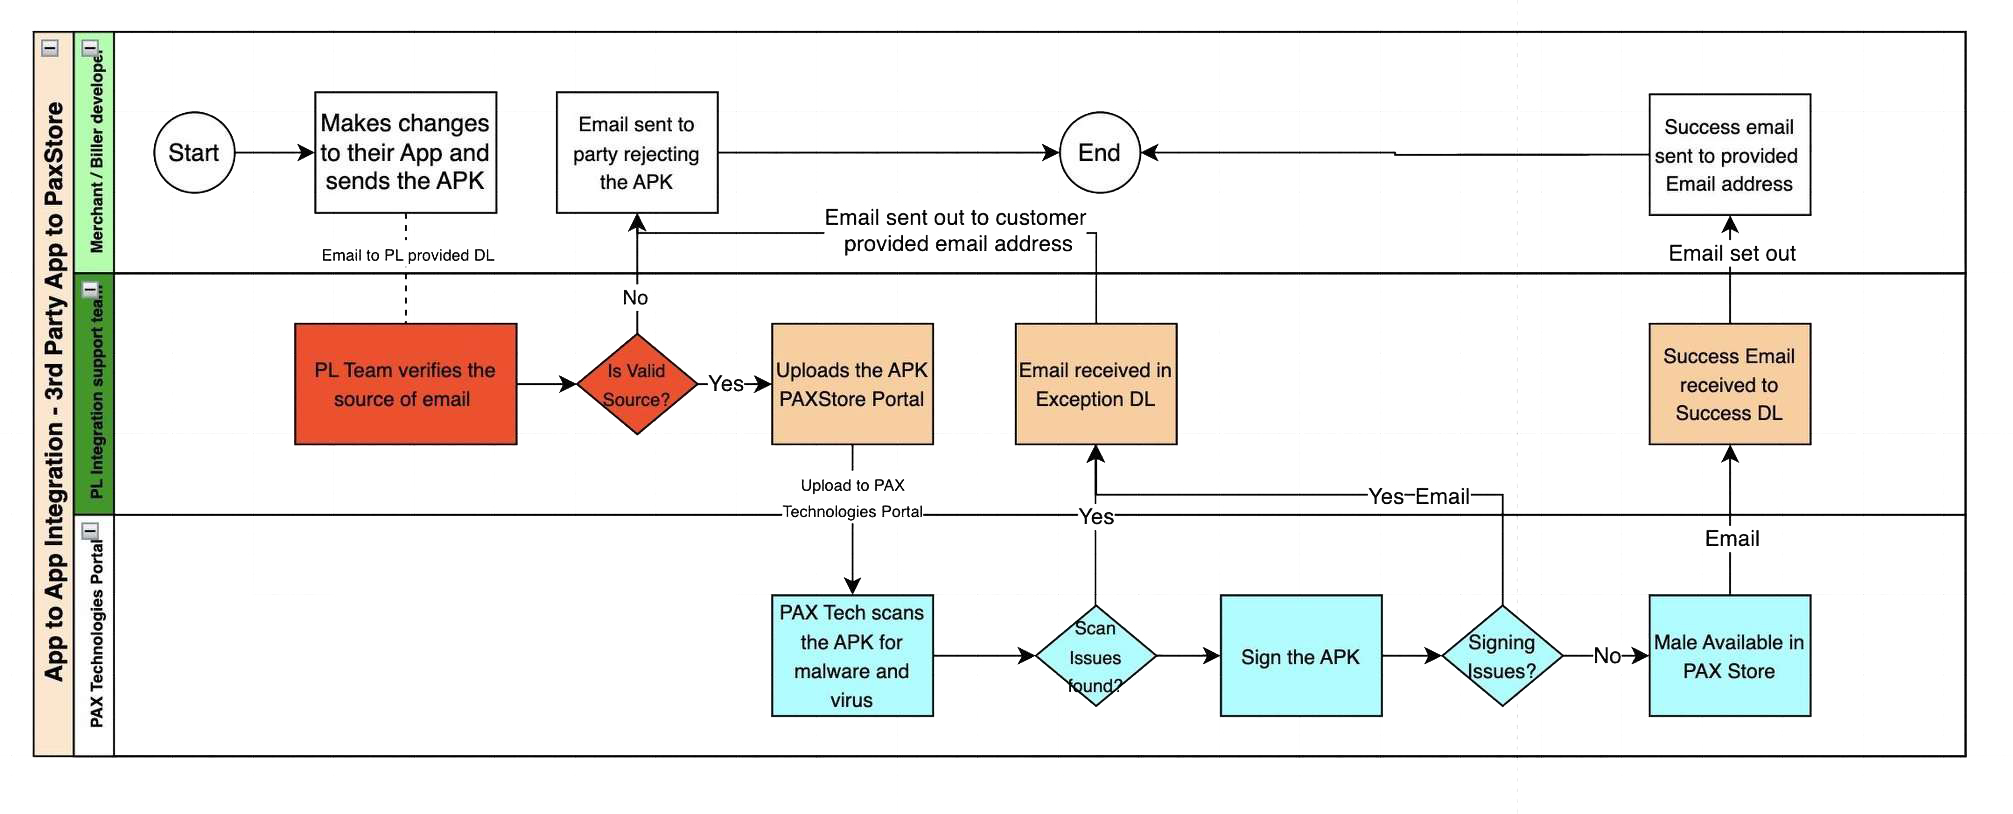
App Certification Process
Any third-party merchant billing application must undergo the Pine Labs certification process as follows:
Security Requirement
The following minimum requirements should be ensured for all existing or new third-party service providers:
- Due diligence should be performed on vendor financial stability before an agreement is entered with third-party service provider. Pine Labs and third-party may enter into an escrow agreement in case of any issues.
-
A non-disclosure agreement (NDA) to be executed between Pine Labs and a third-party service provider:
- Pine Labs defined NDA shall be executed with third-party service providers, but not limited to liabilities, security, and confidentiality requirements.
-
Application Security Assessment document:
-
Application Secure Code Review Report:
- An application secure code review report shall be obtained from the vendor, which would have been tested against OWASP and SANS, and the same shall be shared with the Information security group before testing.
-
Application Pentest Report:
- Application penetration testing reports and assessment reports should be obtained from third-party service providers that are tested against OWASP and SANS requirements. The same shall be shared with Information security group before testing.
-
Application Secure Code Review Report:
- The business should review the change management process in place with third-party service provider.
- The business should review processes in place by third-party service providers to periodically share patches for applications to minimize risks to Pine Labs.
-
The following technical controls should be evaluated by business such as:
- Application interface authentication
- Data masking techniques
- Restful API’s
-
Security Assessment Ownership and Requisites:
- Security assessments on third-party applications will be under the ownership of the Pine Labs information security team. The QA team shall provide the following details for the security Assessment:
Sr. No. Question Response 1 Company Name 3rd Party Name 2 Application Details Complete use case of Application 3 Request and Response Parameter 4 Request and Response Parameter
- Security assessments on third-party applications will be under the ownership of the Pine Labs information security team. The QA team shall provide the following details for the security Assessment:
-
Security Assessment by Pine Labs:
- After compliance with the above mentioned requirements from A to F, the information security group at Pine Labs will conduct an assessment of the application to identify security-related weaknesses as per OWASP and SANS guidelines.
-
Internal Approval:
- The Pine Labs Security team also requires approval from the Integration Team Head before initiating any signing or security assessment of the application.