Local Integration with Linux OS
Overview
This document serves as a complete reference guide for individuals seeking to utilize the Pine Labs Linux PoSlib library and PoS Controller for integration with billing system. Its primary focus is to assist in the acceptance of payments, processing of transactions, and the seamless return of payment results to the invoking application.
The Billing System can be integrated on Linux platform in two different ways:
- Direct Integration with PoSLib (Library)
- Integration with PoS Controller
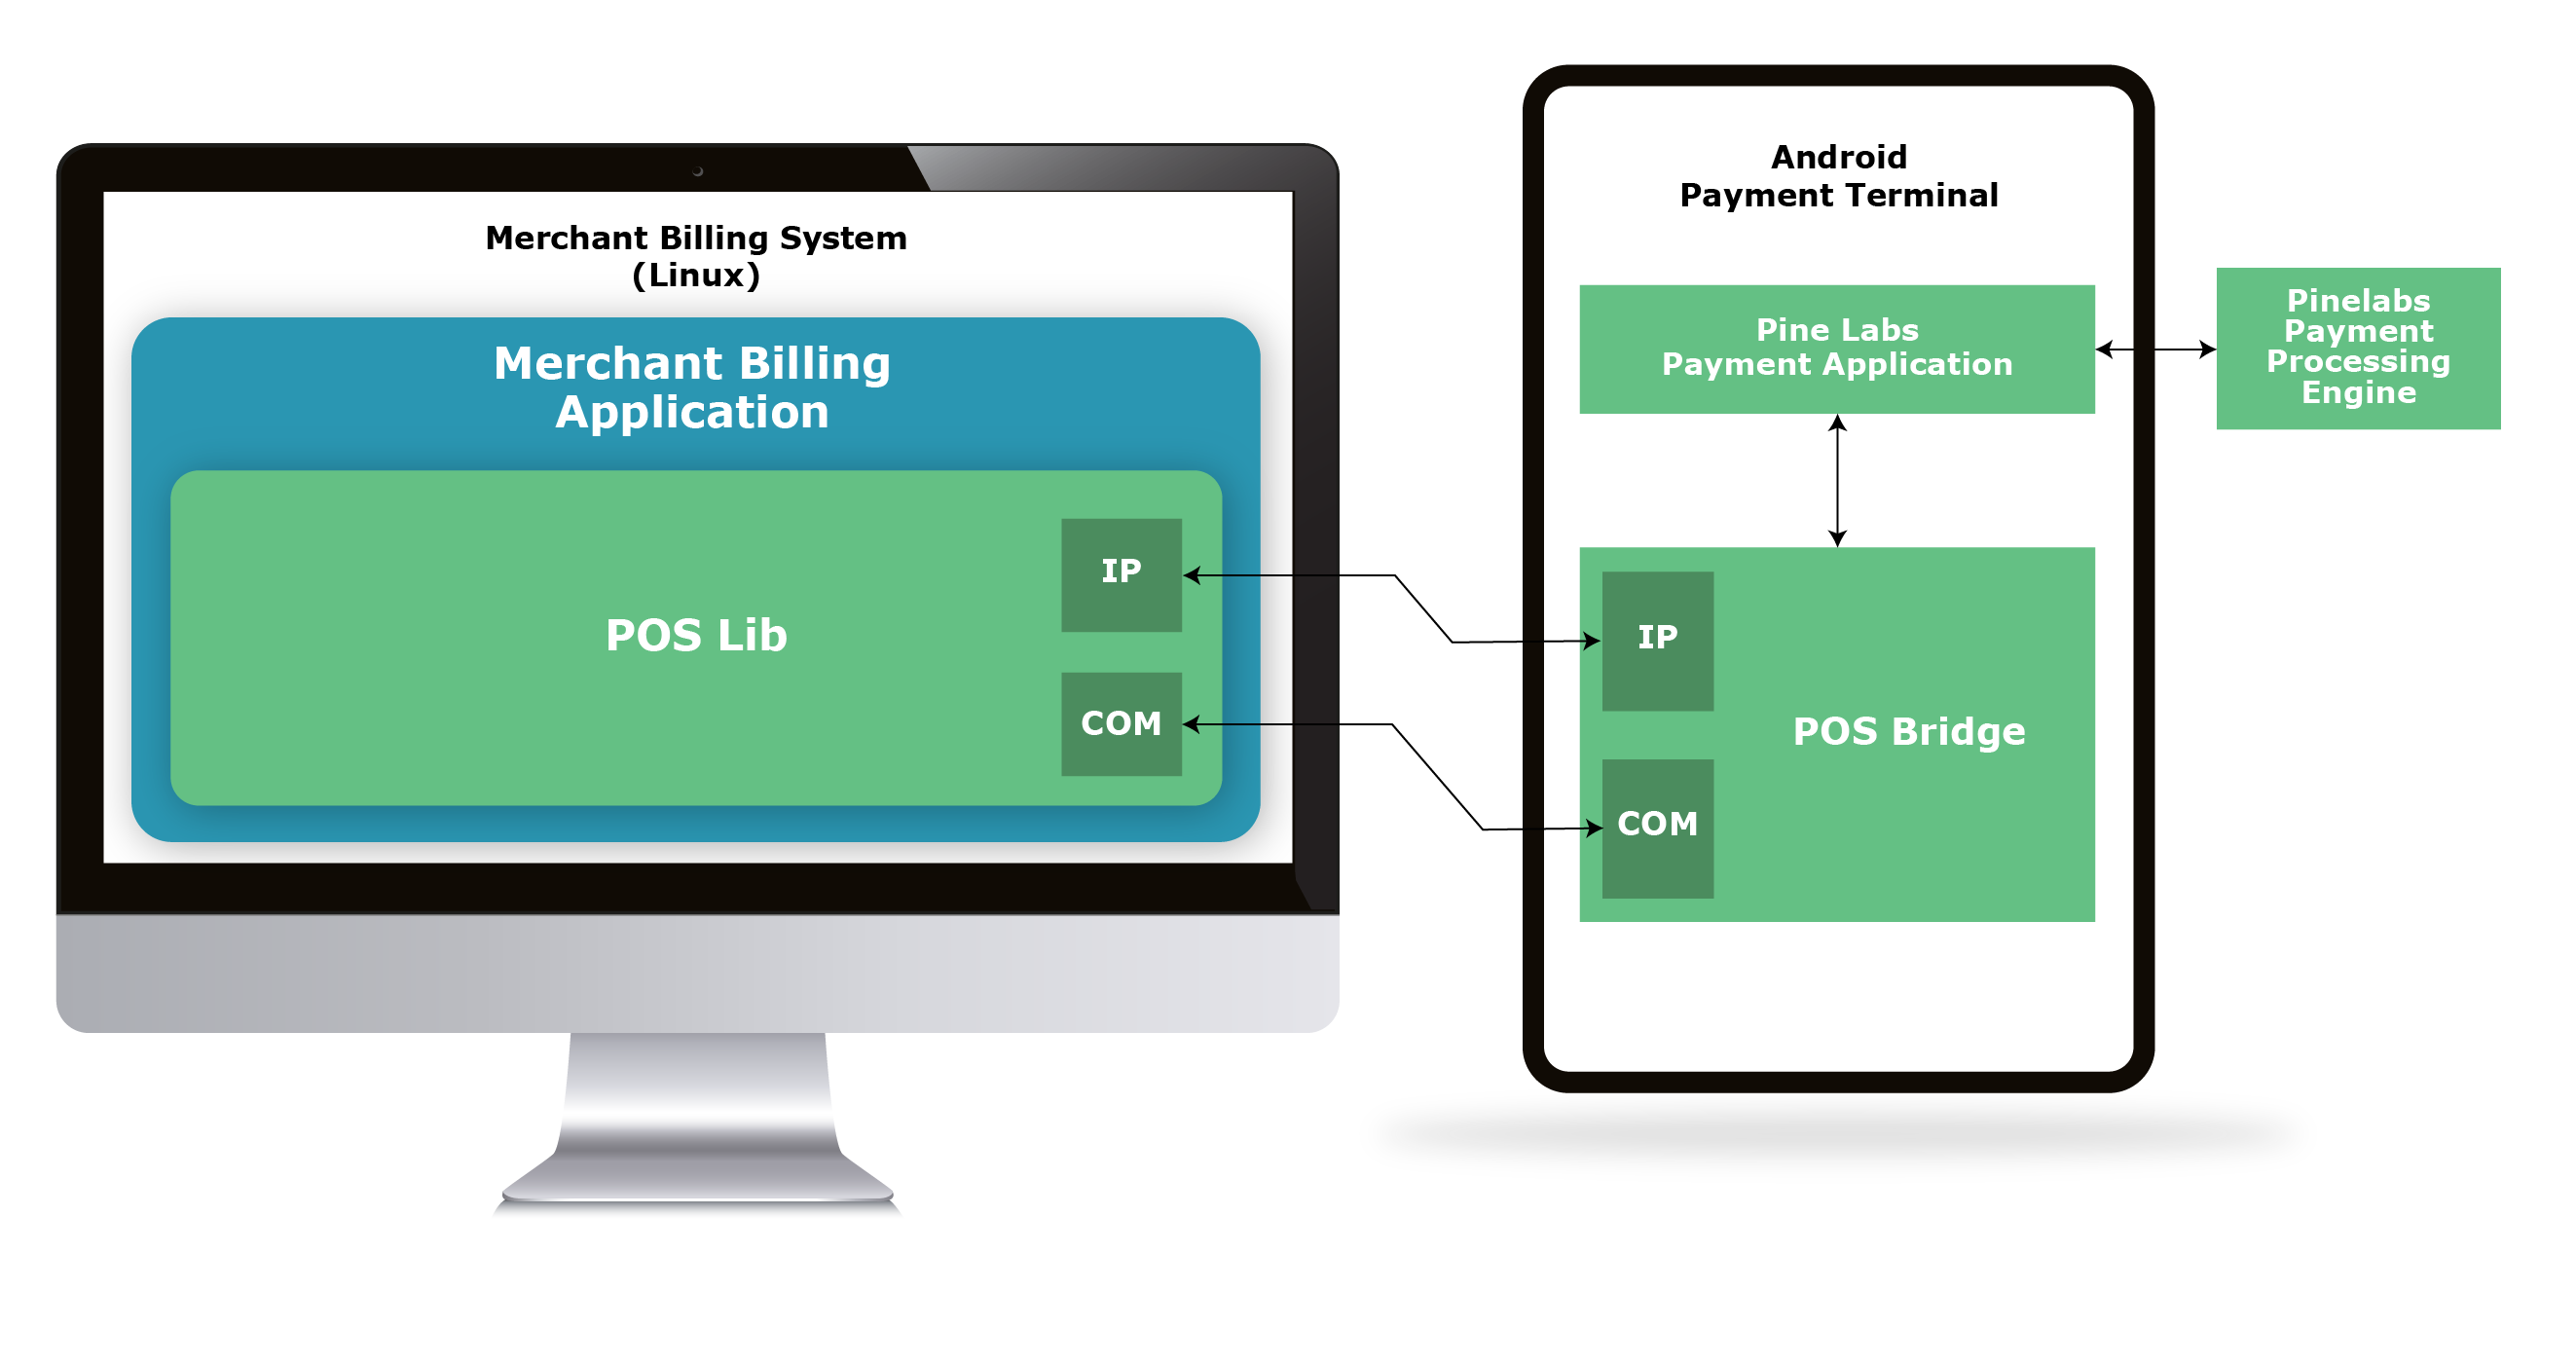
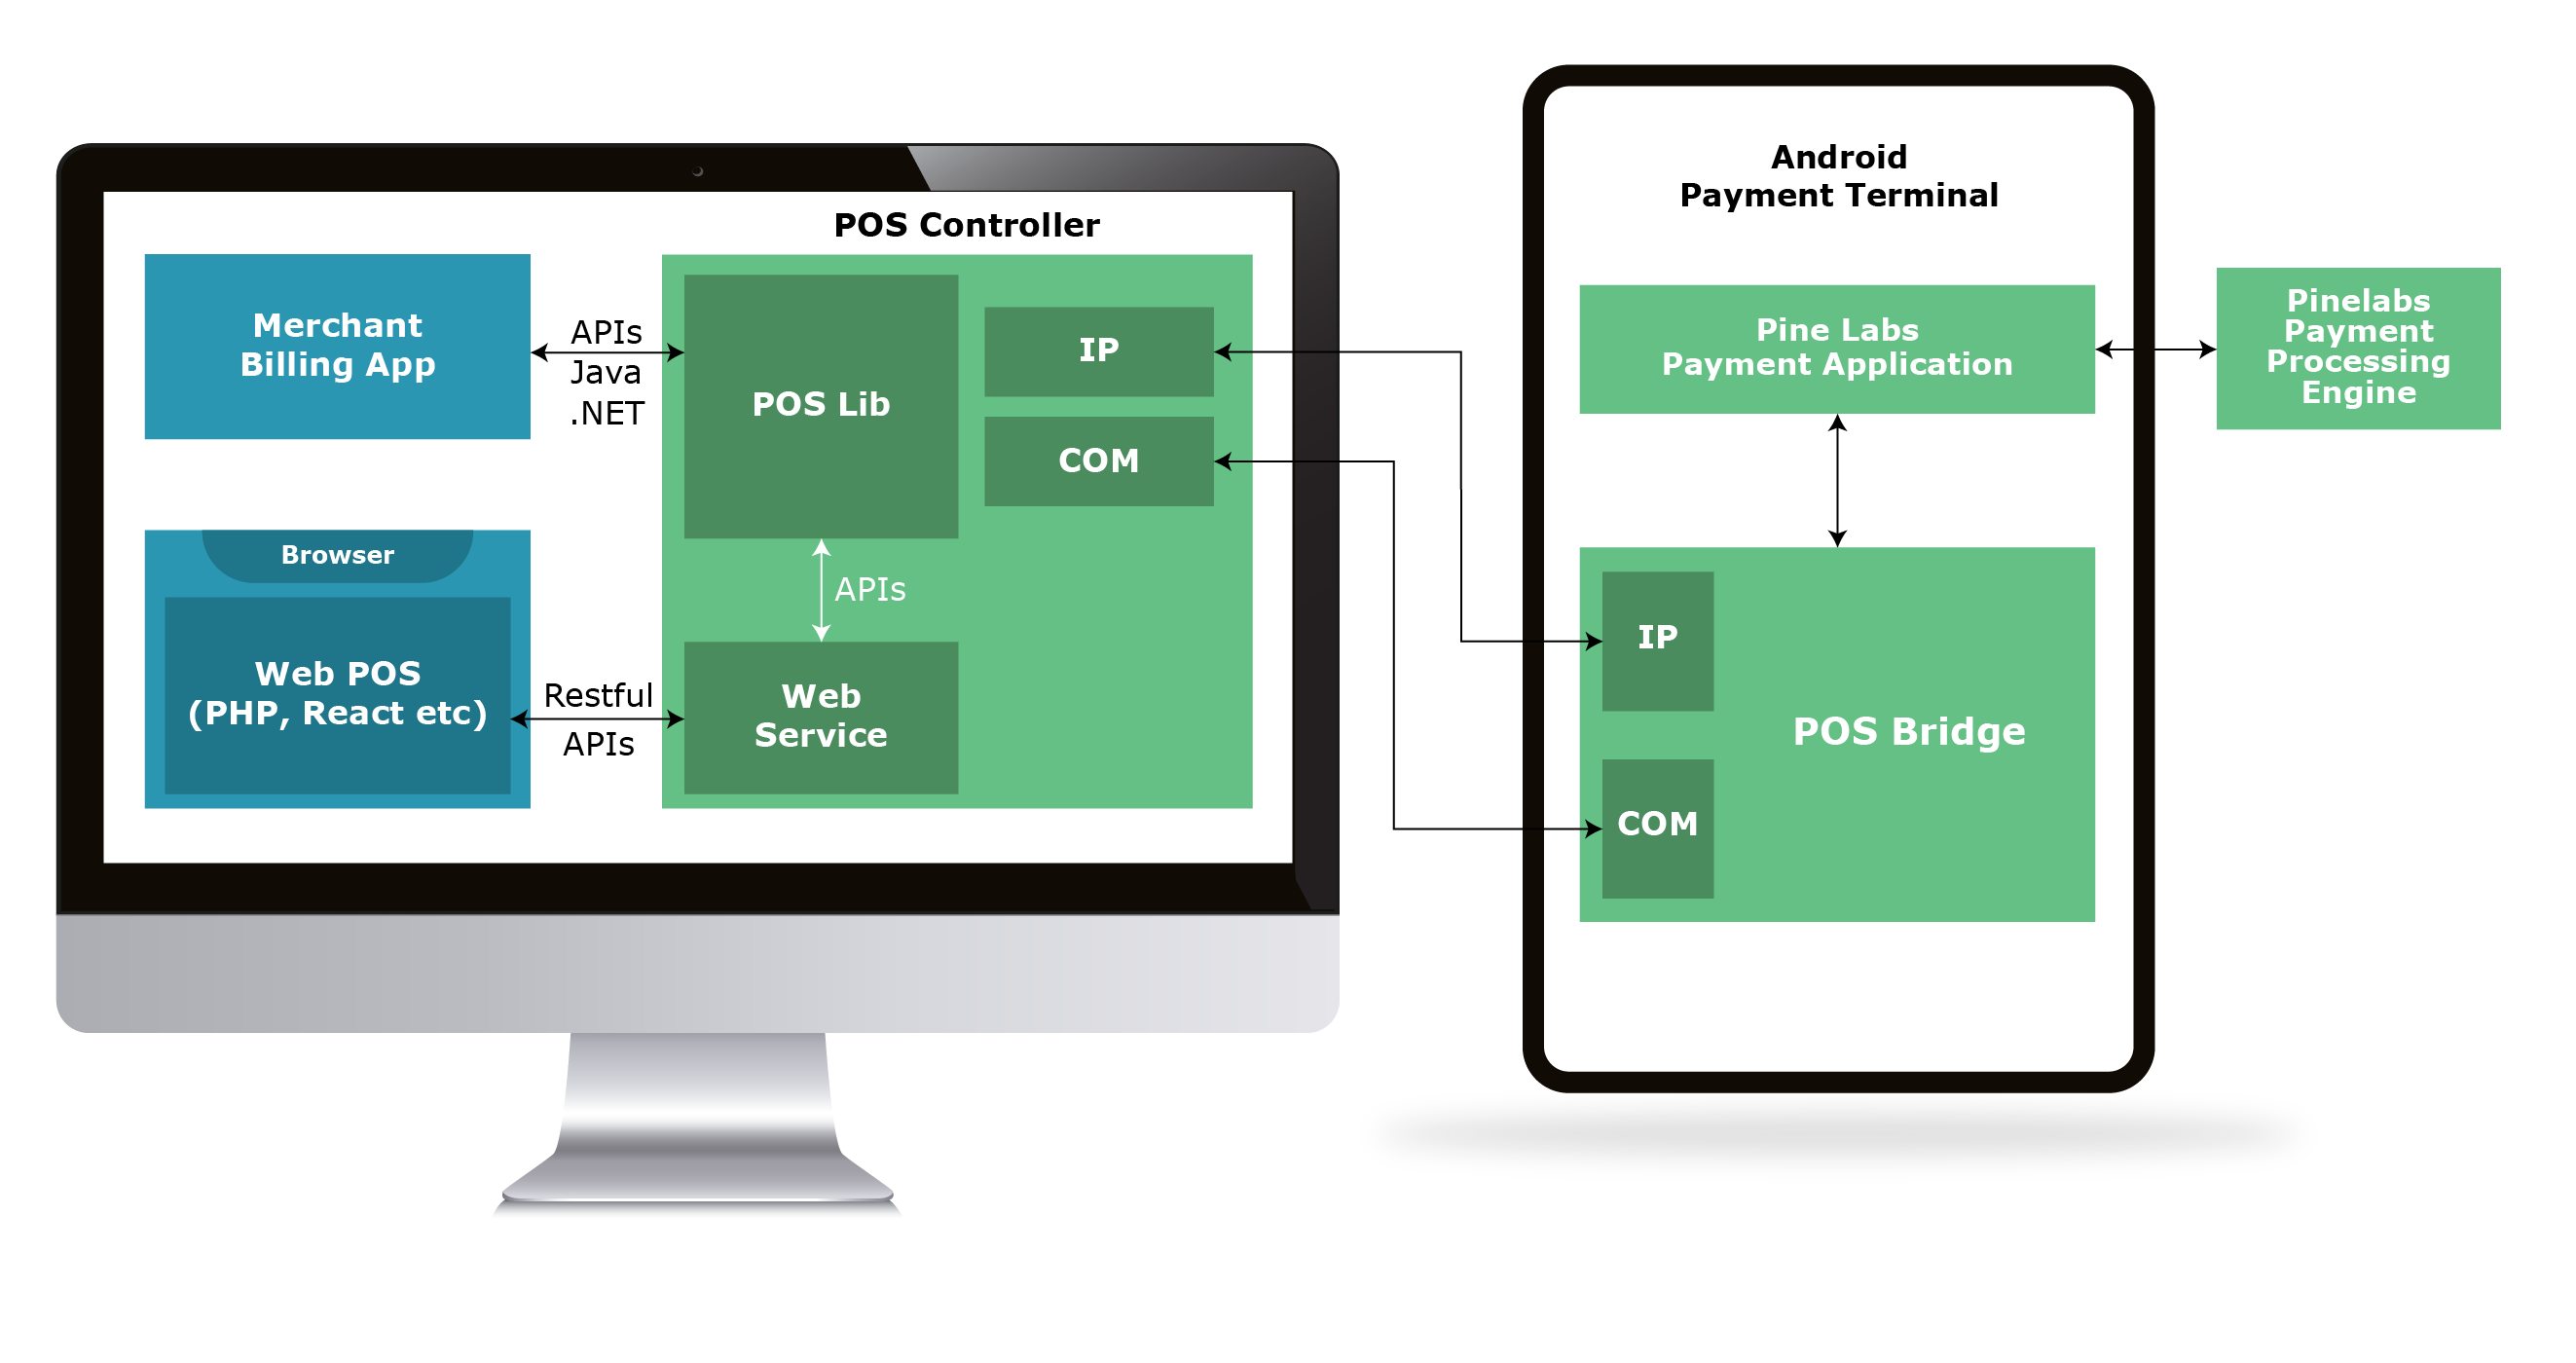
In both type of integration the Merchant Billing application communicates with the Pine Labs Android Payment application through PoSBridge. Therefore, the merchant should ensure that PoSBridge is running on the Android payment terminal before initiating any transactions from the billing application.
The following sections provide detailed insights into both direct integration with PoSLib and integration with PoS Controller.
PoSLib Integration
In this approach, the Merchant Billing application, running on Linux OS, communicates with the Pine Labs payment application by integrating the java PoSlib. The PoSlib facilitates communication with the Pine Labs android payment application via PoSBridge.
The Merchant Billing application needs to integrate PoSlib to communicate with the PoSBridge through PoSLib APIs. The message exchange between PoSLib and PoSBridge can occur over IP and Com(USB/Serial).
Note*- Merchant billing application built on Java should integrate the Java PosLib provided.
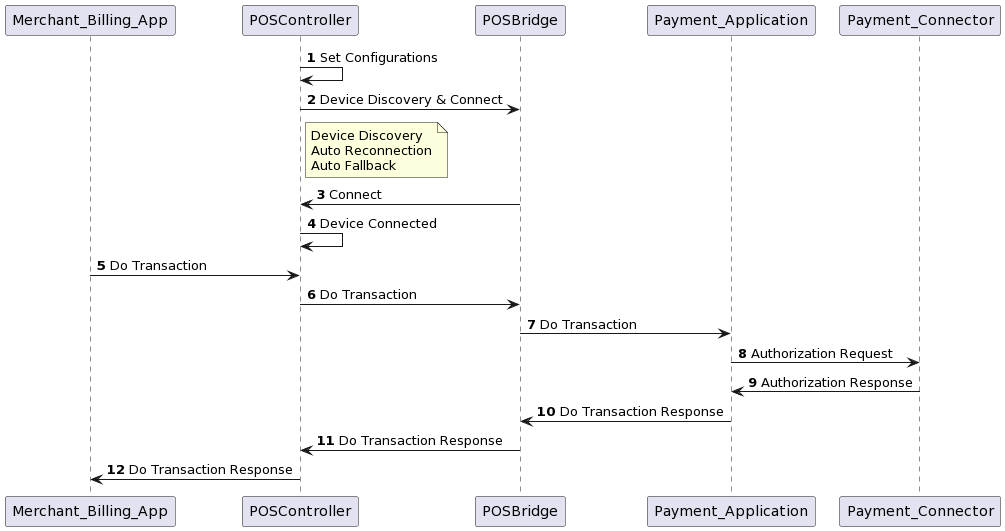
The following sequence diagram describes the transaction flow
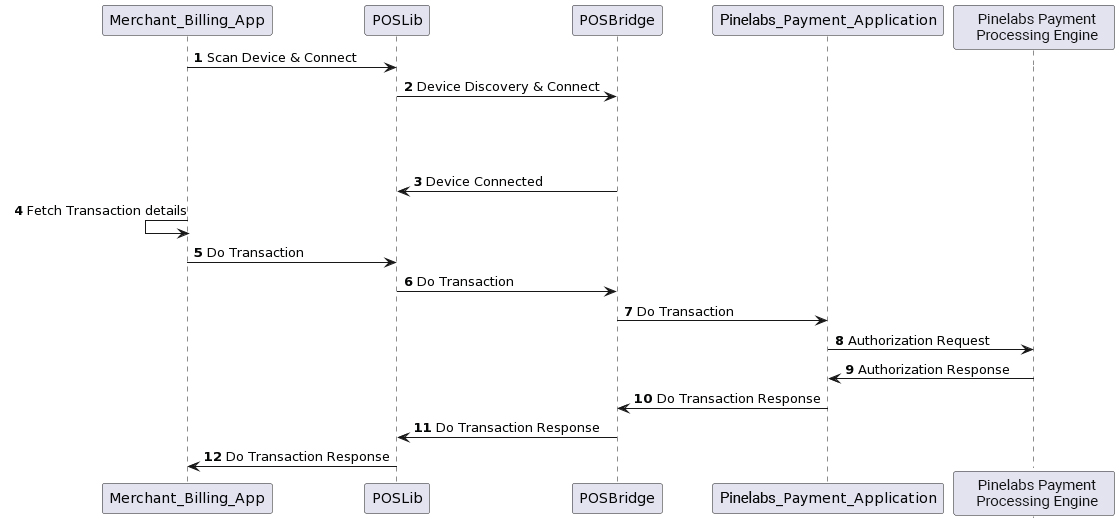
Merchant Billing Application should integrated with respective PoSLib to perform transactions with Android payment application
- Merchant Billing Application calls scan & connect IP and COM devices via PoSLib APIs.
- PoSLib will send device discovery request to connect with PoSBridge.
- PoSBridge will respond with the device connected status.
- Merchant Billing Application will fetch transaction details.
- Merchant Billing Application sends the transaction request to PoSLib by calling doTransaction API.
- PoSLib will process the doTransaction and forward the transaction request to PoSBridge.
- PoSBridge will process the doTransaction request and forward the transaction request to PineLabs Payment Application.
- PineLabs Payment Application will process the transaction request and sends the payment request to PineLabs Payment Processing Engine for authorization.
- PineLabs Payment Processing Engine sends the payment authorization response to PineLabs Payment Application.
- PineLabs Payment Application will process the payment authorization response and sends the doTransaction response to PoSBridge.
- PoSBridge will process the doTransaction response and forward the doTransaction response to PoSLib.
- PoSLib will process the doTransaction response and forward the doTransaction response to Merchant Billing Application.
Supported Features
The following features (APIs) are supported by Linux PoSLib:
| Supported APIs | Functionality / Description |
|---|---|
| posLibInitialize | This API will be Initialize by the POS lib. This will be the first API to be called. |
| scanOnlinePOSDevice | This API will be used to auto discover/scan for POS device in same network (Wi-Fi) |
| scanCOMDevice | This API will be used to scan COM device connected to the system |
| setConfiguration | This API will be used set the required configuration to PoSlib |
| getConfiguration | This API will be used get the configuration settings from PoSlib |
| testTCP | This API will be used to check for TCPIP connection |
| testCOM | This API will be used to check COM connection |
| doTransaction | This API will be used to perform transaction with Payment Application |
Steps to Integrate PoSLib
- Step 1: Download PoSLib from here and Extract.
-
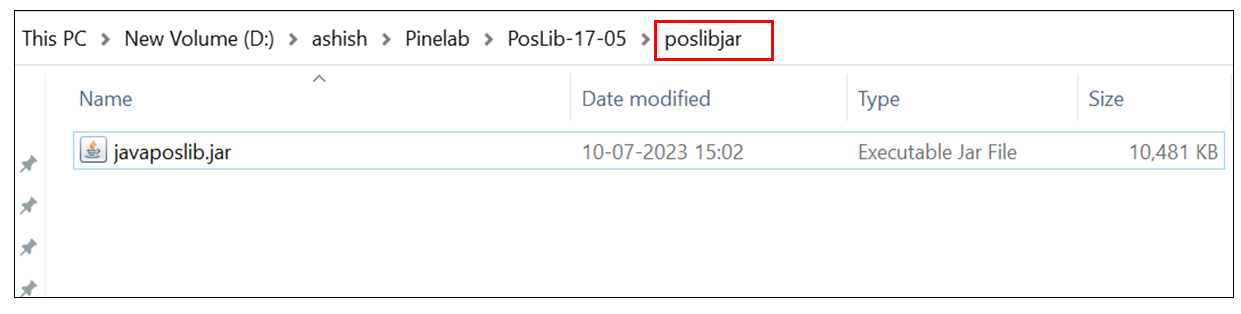
Step 2: Copy the JAR file into the poslibjar folder of the project in your local drive.
-
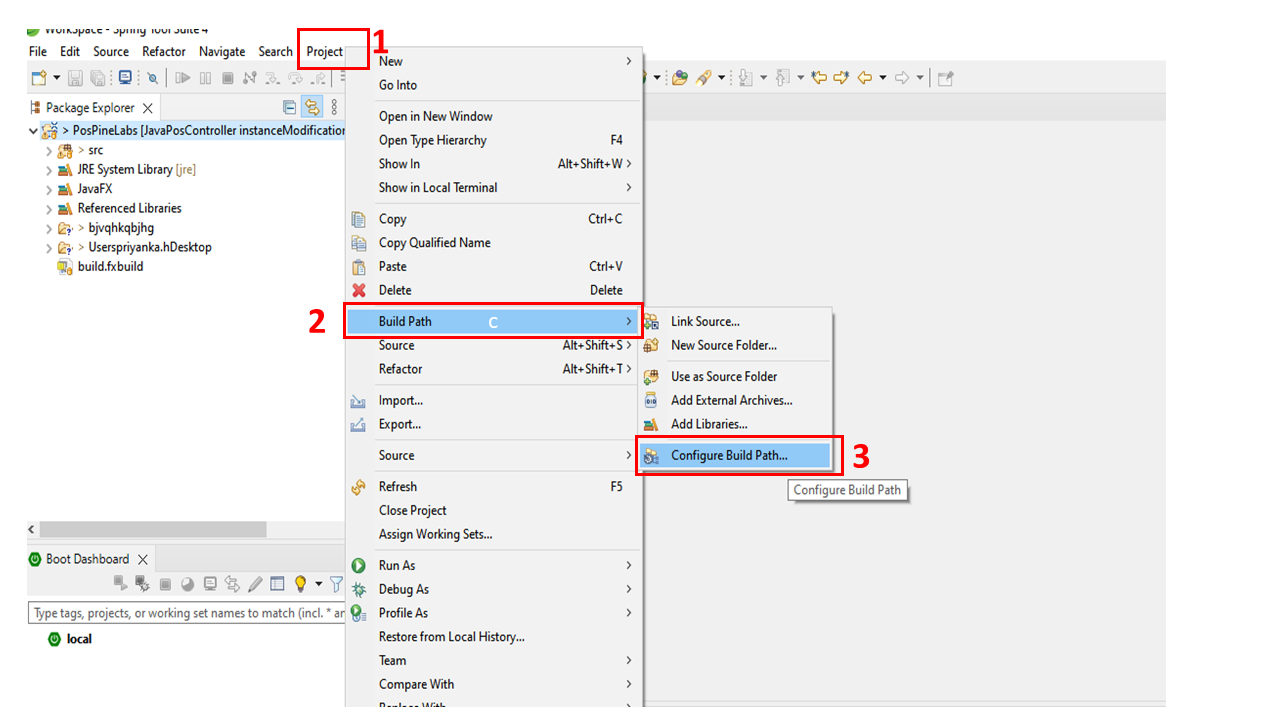
Step 3: Launch STS, and go to Project => Build Path =>Configure Build Path.
- Step 4: Click “Add External JARs” .
- Step 5: Select all the .jar files from the extracted from the package.
- Step 6: Click “Apply and Close.”
API Integration
The following section describes the APIs exposed by PoSLib, details of the API and integration sample code snippets
Same API specification for java.
scanOnlinePOSDevice
This API will auto-discover the android payments terminals on the same network where PoSBridge is running on it and list them
| Signature | void scanOnlinePOSDevice( ScanDeviceListiner scanDeviceListiner) |
| Parameters | scanDeviceListener – Device listener |
| Returns | None |
| Call-backs |
OnSucces( List< DeviceDetails > list) -List of Devices discovered OnFailure(String errorMsg, int errorCode) -Error Message -Error Code |
| Error Condition |
• Response timeout • Device disconnected • Parsing error • Network down |
| Notes | In response devicedetails isCom set to false and comPortNumber,comslno and comDevId will be set to null for scanOnlinePOSDevice API call return |
Code snippet for scanOnlinePOSDevice:
Java
public class Device { private String deviceIp; private String devicePort; private String devId; private String slNo; private boolean isCom; private String comPortNumber; private String comDevId; private String comslno; } ScanDeviceListener scanDeviceListener = new ScanDeviceListener() { @Override public void onSuccess(Listlist) { // Retrieve the device list here } @Override public void onFailure(String errorMsg, int errorCode) { // Handle error here } }; PosLib.getInstance().scanOnlinePOSDevice(scanDeviceListener);
scanOnlinePOSDevice
This API will auto-discover the Android payment terminals on the same network where PoSBridge is running and list them.
| Signature | public void scanOnlinePOSDevice(ScanDeviceListener scanDeviceListener, Context context ); |
| Parameters | scanDeviceListener – Device listener context – Application context |
| Returns | None |
| Call-backs |
OnSucces( List< DeviceDetails > list) -List of Devices discovered OnFailure(String errorMsg, int errorCode) -Error Message -Error Code |
| Error Condition |
Response timeout Device disconnected Parsing error Network down |
| Notes | In response devicedetails isBtDevice set to false and btDeviceSsid and btDeviceName will be set to null for scanOnlinePOSDevice API call return |
Code snippet for scanOnlinePOSDevice:
Java
public class DeviceDetails {
private boolean isBtDevice;
private String deviceSlNo;
private String deviceId;
private String deviceIp;
private String devicePort;
private String btDeviceSsid;
private String btDeviceName;
}
Button buttonScanDeviceViewTcp;// Button for scan online device
buttonScanDeviceViewTcp.setOnClickListener(new View.OnClickListener() {
@Override
public void onClick(View view) {
showProgress("Searching");
handler.postDelayed(() -> PosLibManager.getInstance().scanOnlinePOSDevice(scanDeviceListener, getApplicationContext()), 1000);
}
});
ScanDeviceListener scanDeviceListener = new ScanDeviceListener() {
@Override
public void onSuccess(List<DeviceDetails> list) {
//"onSuccess"
//Prompt device list and get the selected device from the user
}
@Override
public void onFailure(String errorMsg, int errorCode) {
//"on failure"
//Handle error message and error code received
}
};
scanSerialDevice
This API will be used to auto-discover PoS device through COM
| Signature | Void scanSerialDevice( ScanDeviceListiner scanDeviceListiner) |
| Parameters | scanDeviceListener – Device listener |
| Returns | None |
| Call-backs |
OnSucces( List< DeviceDetails > list ) - List of Devices discovered OnFailure(String errorMsg, int errorCode) - Error Message - Error Code |
| Error Condition |
• Response timeout • Device disconnected • Parsing error |
| Notes | In response device details isCom set to false and devicePort,devId and slNo will be set to null for scanComDevice API call return |
Code snippet for scanComDevice:
Java
public class Device { private String deviceIp; private String devicePort; private String devId; private String slNo; private boolean isCom; private String comPortNumber; private String comDevId; private String comslno; } ScanDeviceListener scanDeviceListener = new ScanDeviceListener() { @Override public void onSuccess(Listlist) { // Retrieve the device list here } @Override public void onFailure(String errorMsg, int errorCode) { // Handle error here } }; PosLib.getInstance().scanSerialDevice(scanDeviceListener);
>setConfiguration
This API should be used to set PoS Library configurations related to connectivity, priority settings, and logging options.
| Signature | int setConfiguration(ConfigData configData) |
| Parameters | configData - Configuration Data |
| Returns | 0 - Success -1 - Failure |
| Call-backs | None |
| Error Condition |
• Invalid IP • Invalid port • IP or Port not configured • POS Lib not initialized |
Code snippet for setConfiguration:
Java
public class ConfigData { private String tcpIP; private String tcpPort; private String devId; private String slNo; private String comPortNumber; private String comslno; private String comDevId; private int retryCount; private int connectionTimeOut; private boolean isConnectivityFallBackAllowed; private int priority1;// 1=TCPIP , 2=COM private int priority2;// 1=TCPIP , 2=COM private String logPath; private boolean isLogsEnabled; private int logLevel; private int dayToRetainLogs; private String cashierId; private String cashierName; } ConfigData configData = new ConfigData(); configData.setComPortNumber(""); configData.setConnectionTimeOut(30); configData.setConnectivityFallBackAllowed(false); configData.setPriority1(1); configData.setPriority2(2); configData.setTcpIP(""); configData.setTcpPort(""); configData.setRetryCount(2); configData.setDayToRetainLogs(2); configData.setLogPath("433a"); configData.setLogsEnabled(false); configData.setLogLevel(1); configData.setDevId(""); configData.setSlNo(""); configData.setComslno(""); configData.setCashierId(""); configData.setCashierName(""); configData.setComDevId(" "); PosLib.getInstance().setConfiguration(configData);
getConfiguration
This API should be used to retrieve PoS Library configurations related to connectivity, priority settings, and logging options.
| Signature | int getConfiguration(ConfigData configData) |
| Parameters | configData - Configuration Data |
| Returns | 0 - Success -1 - Failure |
| Call-backs | None |
| Error Condition |
• Invalid IP • Invalid port • IP or Port not configured • POS Lib not initialized |
Code snippet for getConfiguration:
Java
public class ConfigData { private String tcpIP; private String tcpPort; private String devId; private String slNo; private String comPortNumber; private String comslno; private String comDevId; private int retryCount; private int connectionTimeOut; private boolean isConnectivityFallBackAllowed; private int priority1;// 1=TCPIP , 2=COM private int priority2;// 1=TCPIP , 2=COM private String logPath; private boolean isLogsEnabled; private int logLevel; private int dayToRetainLogs; private String cashierId; private String cashierName; } ConfigData configData = new ConfigData(); int result = PosLib.getInstance().getConfiguration(configData);
This API will verify connectivity between the merchant billing system and the Android payment terminal in IP connectivity mode.
| Signature | boolean testTCP(String IP, String port) |
| Parameters | IP - Payment terminal IP Port - POS Bridge port |
| Returns | true - Success false - Failure |
| Call-backs | None |
Code snippet for testTCP:
Java
boolean result = PosLib.getInstance().testTcp(ip, port);
testSerialCom
This API will verify connectivity between the merchant billing system and the Android payment terminal in COM connectivity mode.
| Signature | boolean testSerialCom(String portName) |
| Parameters | portName – port number |
| Returns | true - Success false - Failure |
| Call-backs | None |
Code snippet for testSerialCom:
Java
boolean result = PosLib.getInstance().testSerialCom(comPort);
doTransaction
This API will be used to perform transaction with android Payment Application
| Signature | void doTransaction(String paymentRequest, int transactionType, TransactionListener transactionListener) |
| Parameters |
paymentRequest - Request message body from billing application. Refer APIs for details of the request payload for each transactions transactionType = 6 // payment transaction type |
| Returns | None |
| Call-backs |
OnSuccess(String paymentResponse) - paymentResponse data for all the supported transaction types OnFailure(String errorMsg, int errorCode) - Error Message - Error Code |
| Error Condition |
• Response timeout • Parsing error • Network down • Comm disconnected |
Code snippet for doTransaction:
Java
String transactionRequest = null; //Required only for TxnType 6 (Payment Transaction) transactionRequest = "4001,TX12345678,10000,,,,,,"; //sale transaction request transactionRequest = "5101,TX12345678,10000,,,,,,"; //Bank EMI transaction request transactionRequest = "5002,TX12345678,10000,,,,,,"; //Brand EMI transaction request transactionRequest = "5120,TX12345678,10000,,,,,,"; //UPI transaction request int TxnType; //payment transaction type TxnType = 6; //Payment transaction TxnType = 9; //get last transaction TransactionListener transactionListener = new TransactionListener() { @Override public void onSuccess(String paymentResponse) { // success //Convert the payment response from CSV hex string format to byte array format and parse the CSV response. } @Override public void onNext(String action) { // listner for onNext action } @Override public void onFailure(String errorMsg, int errorCode) { // failure //Handle error message and error code here } }; PosLib.getInstance().doTransaction(transactionRequest, transactionListener);
>PoS Controller Integration
In this approach, the Merchant Billing application running on Linux OS, communicates with the Pine Labs payment application by integrating the PoS Controller. The PoS Controller facilitates communication with the Pine Labs android payment application via PoSBridge.
PoS Controller is a software that offers a user-friendly interface for integrators. It allows them to scan and set up various communication modes (IP and COM), manage logging, and configure other communication settings.
- PoS Controller is integrated with PoSLib and supports all the PoSLib features with rich UI experience.
- All the required configurations related to connectivity and logging can be made on PoS controller.
- The desktop merchant billing application can establish connection with the PoS Controller through the localhost on port 8082.
- The web based billing application can establish connection with the Pos Controller through the http://localhost:8080/web/doTransaction API.
- Set connectivity configuration in PoS Controller.
- PoS Controller sends device discovery request to connect with PoSBridge.
- PoSBridge responds with the device connected status.
- PoS Controller connects to the devices.
- Merchant Billing Application fetches transaction details and sends the transaction request to PoS Controller via local host communication.
- PoS Controller processes the doTransaction and forwards the transaction request to PoSBridge.
- PoSBridge processes the doTransaction request and forwards the transaction request to PineLabs Payment Application.
- PineLabs Payment Application processes the transaction request and sends the payment request to PineLabs Payment Processing Engine for authorization.
- PineLabs Payment Processing Engine sends the payment authorization response to PineLabs Payment Application.
- PineLabs Payment Application processes the payment authorization response and sends the doTransaction response to PoSBridge.
- PoSBridge processes the doTransaction response and forwards the response to PosController.
- PoS Controller processes the doTransaction response and forwards the response to Merchant Billing Application.
Steps to integrate PoS Controller
For Desktop Billing Application(java)- Make sure all the communication parameters and other required configuration are configured in PoS Controller application.
- The billing application should establish connection with the PoS Controller through the localhost on port 8082.
- Once the connection is establish billing application as to build the CSV request (as defined in API section) and send the request to PoS Controller.
- PoS Controller will communicate with Android payment application based on the communication priorites selected and returns the result to billing application.
- Make sure all the communication parameters and other required configuration are configured in PoS Controller application.
- The web billing application should establish connection with the PoS Controller through the http://localhost:8080/web/doTransaction API.
- Once the connection is establish billing application as to build the CSV request (as defined in API section) and send the request to PoS Controller.
- PoS Controller will communicate with Android payment application based on the communication priorites selected and returns the result to billing application.
Steps to install PoS Controller
Step 1:
Ensure that your computer meets the minimum system requirements for the software.
Ubuntu 18.0.4 LTS, Ubuntu 20.0.4 LTS, Ubuntu 22.0.4 LTS
Step 2: Download the PoS Controller jar package from here.
Step 3:
From the terminal run "java -jar filename.jar" to start the PoS Controller.
Note Here filename is the PosController jar file name.
Step 4: After running the cmd, PoS Controller software will be opened, a Boot Up Splash screen followed by the Login screen will be displayed. Enter appropriate details in the Cashier ID and Cashier Name fields
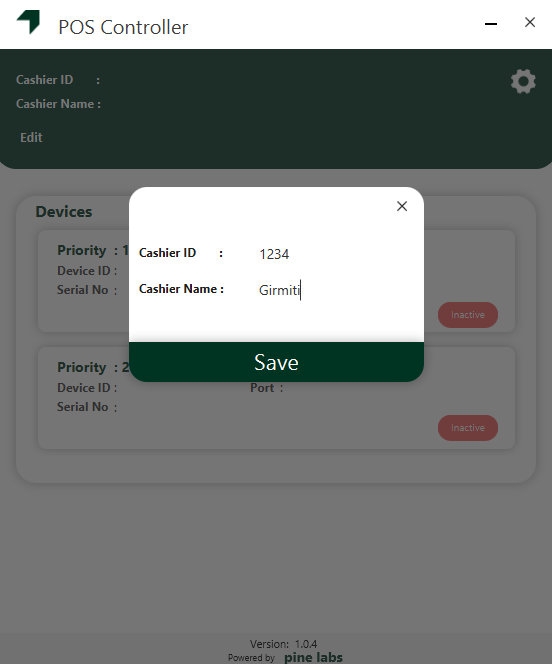
Step 5: Click on "Save" button to save the Cashier details.

Step 6: Click on "Setting" button on the home screen to navigate to setting screen.
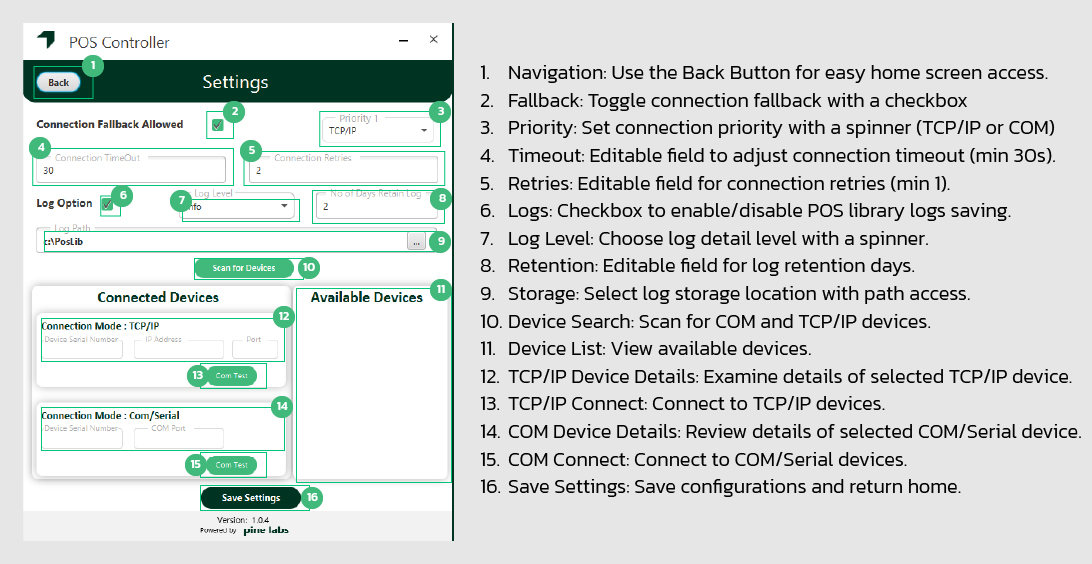
Step 7: On the Settings screen, configure the settings for fields 2 to 9 as needed.
Step 8:
Click on "Scan for Devices" button to scan for all the available online and Com/Serial devices.
Note: Online devices are those where the PoSBridge is currently operational and connected to the same network as the billing system. COM/Serial devices are those where the PoSBridge is currently operational and connected to the same billing system via COM/Serial cable.
Step 9: Once the devices are scanned the PoS Controller will list all the available devices (Both com/serial and Online) in the "Available Devices" panel.
Step 10:
Under the "Available Devices" panel all the available devices are listed with the respective device details(Device ID, Mode, Serial No). User has to select the device based on the details by clicking the select button.
Note:
- "Device ID": Payment terminal device ID
- "Mode": If mode is TCP/IP means the device is available to connect over TCP/IP. If mode is COM means the device is available to connect over Com/Serial
- "Serial No": Payment terminal serial number
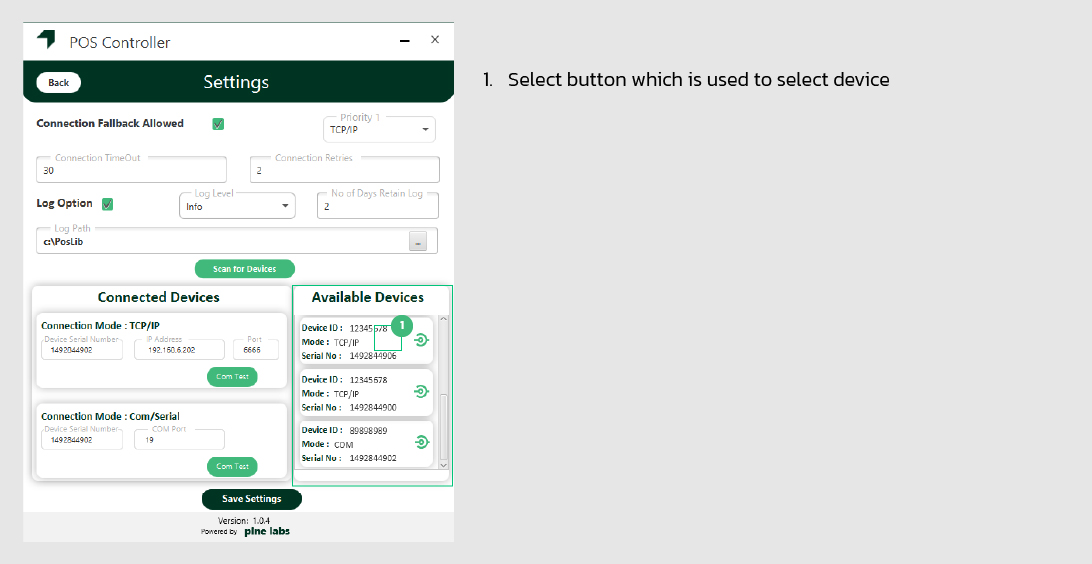
Step 11: After selecting the devices under the available devices the selected devices will be displayed under respective TCP/IP and COM panel.
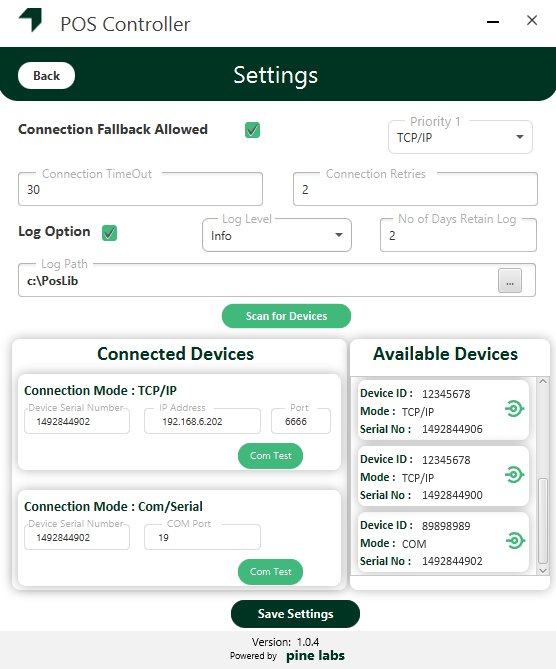
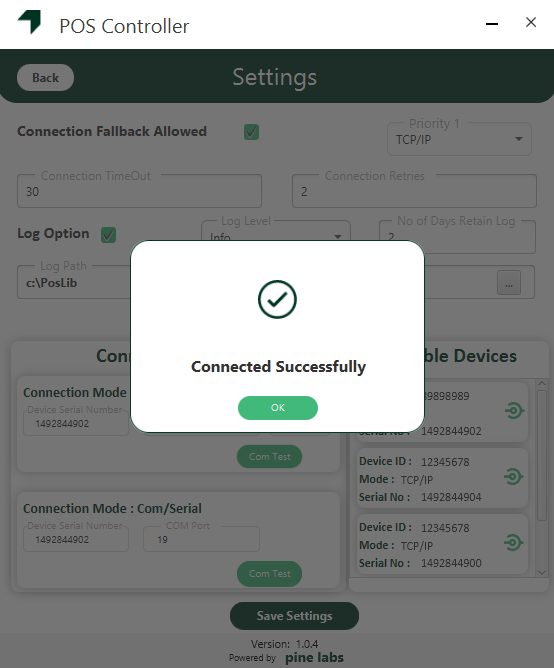
Step 12: User can use the "Connect" button to check the connectivity status of TCP/IP or COM.
Step 13:
Click on the "Save Settings" button to save all the configured options.
Note: If the user does not save the configuration, then all the configured values will not be saved in Pos Controller.
Supported features
Device Discovery
- PoSLib provides API for IP and COM mode to discover the Payment terminals automatically and provide user to select the device to connect.
- User does not need to enter any of the Connectivity details for IP and COM connectivity.
- COM Discovery-Device Serial and COM Port will be discovered and available to connect.
- IP/Wi-Fi Discovery is performed using the UDP protocol and provides Device Serial number, IP and Port details.
- If more than one Payment device is available, PoSlib will provide list of devices to choose from.
Connectivity Features
PoSLib provides below features for Connectivity retention and configuration
Priority Setting and Auto fallback
- Billing Application can set the priority for the available connectivity options.
- Auto fallback feature is supported. It can be enabled or disabled based on the requirement. If it is enabled, device will fallback to second priority connection if there is an issue with primary connection.
Connection Retention & Retry
- Billing application can configure retry count and connection timeouts.
- PoSLib retains the connection data and application can directly connect using the saved data.
Logging
PoSLib supports logging options to capture Transaction exchange between Billing Application and PoSLib.
For Setup & Installtion instructions of Android components, please refer Terminal Setup section.